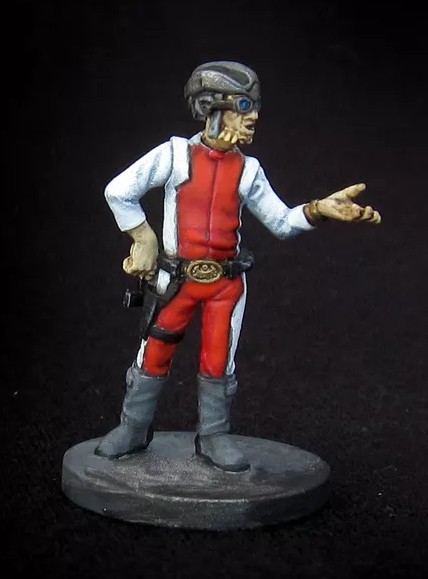
Wave 11 Villain Pack – Hondo Ohnaka

Hondo Ohnaka, painted and photographed by Muzza on boardgamegeeks.com
Campaign
Hondo Ohnaka has connections. And he is not above exploiting them for the Empire. First, let’s talk about statistics. A Threat Cost of 6 gives you 9 Health, a Speed of 5, a white defense die and a ranged attack with blue-red-green. The Surge Abilities for +1 Damage and +2 Accuracy do look meager until you see his ability and realize, he doesn’t need them to make life hell for the Rebels.
Negotiate sounds innocent, but the Rebels must choose to either give you 2 Threat or +2 Damage on your attack with Hondo. Both are excellent for you, unless the bonus damage is wasted into a Dodge, of course. Ulterior Motive lets you nab an additional 2 Threat if you run over crates the Rebels just keep ignoring. So Hondo might cost 6 Threat to deploy, but you gain some of it back so easily, that you should really look at him as 4 Threat figure. With that in mind, he is crazy good. You should tailor your Agenda Deck to support him as long as possible, though.
His Agenda Set, “Ohnaka Gang” doesn’t help you with this. Final Offer is a slightly stronger version of Negotiate that you can also play with any Mercenary group. For 1 Influence, it is not as strong as some other Threat increasing Agenda Cards, but early in the campaign can swing the pendulum in a mission hard. Missing Treasure is … what? You get to deploy Hondo for free in a mission. And it only costs 1 Influence? You really need to read carefully, as it also says Hondo can’t declare attacks. So you only can gain Threat by running over crates. You of course can also use him to pad your activations and block line of sight. But that usually doesn’t give you that much of an edge. Maybe you can find a better use, but in general, it is not worth picking up.
To recruit Hondo Ohnaka for your campaign, you need to win the side mission The Pirate’s Ploy, which is included in this pack. This side mission requires tiles from the Tyrants of Lothal box expansion!
Hondo Ohnaka appears in the following campaign missions:
- Tyrants of Lothal Side Mission: Call to Action
- Tyrants of Lothal Side Mission: Siege on Geonosis
- Tyrants of Lothal Side Mission: Race on Ryloth
- Wave 11 Pack Hondo Ohnaka: The Pirate’s Ploy
Skirmish
With the same statistics as his Campaign Deployment Card, his Skirmish Deployment Card changes the Threat shenanigans for VP manipulation. Negotiate makes your enemy pay 2 VPs or your attack gains +2 Damage. Note that your opponent can’t break their VP bank and in the first round most likely can’t even pay you if they wanted. What’s Yours is Mine steals 2 VPs off of your opponent’s score if Hondo enters their Deployment Zone. You might want to combine that with Smuggler’s Run to get a pretty hefty boost to your VPs if you plan to go there anyway. Both are not bad, but the issue with Hondo is, that his range is surprisingly short, with a minimum range of 3 and an average range of 5. This makes him hard to wield, especially on larger maps.
The Command Cards in his pack are a bit underwhelming as well. Hostile Negotiations drops two (don’t forget, you have to play Hostile Negotiations as well!) of your Command Cards for two of your opponent’s Command Cards. Since it is random for your enemy, a cost of 1 seems too high for this card. You can maybe get away with it if you have solid card draw, but then you should include cards that actually further your goals, not hindering both you and your enemy, slowing the game down. Hondo’s special Let’s Make a Deal Command Card lets you spend VPs to decrease damage on an attack against him. If you can get away with 1 or 2 VPs spent for this, then it can be useful. Spending more hurts you more than you might realize. Out of Time can only be used by Mercenary figures and is a killer in the late game. If you draw it early, it’s probably dead in your hand, as your opponent still can choose to discard cards in that case. Good card, but situational. Worth Every Credit personally reminds me of Heart of Freedom. It’s not bad and a must if you rely on unique Mercenary figures. The fact that you need to defeat a hostile figure to make use of the bonus 2 VPs can be tricky. But it’s the most valuable card in the pack for sure, as it’s pretty universally useful.
Lie in Ambush sound so cool. Since your opponent sees your ambush, it’s just meh. You can force him to camp in their Deployment Zone so he doesn’t get ambushed. But you are giving up one activation for this for probably multiple rounds. Is this worth it? For one Deployment Cost as well? I think this card has a neat idea, without following through.
Model
Hondo parlaying with other figures on the board is fitting. He certainly doesn’t pull your attention, but when he does, it’s for all the wrong reasons (him stealing your stuff).